
Building your first web app is one of the most exciting milestones in a developer’s journey. It’s the moment your code stops being just practice exercises and starts becoming something real — something people can actually use. Whether you want to build a to-do list, a weather app, or a simple social platform, the process starts the same way.
This guide walks you through everything you need to know to build your first web app from scratch — from planning to deployment.
What is a Web App?
A web app is a software application that runs in a web browser. Unlike regular websites that just display information, web apps are interactive — users can log in, submit data, get personalized results, and more.
Examples of web apps you already use every day include Gmail, Google Docs, Trello, and YouTube. Your first app won’t be that complex — but the building process follows the same principles.
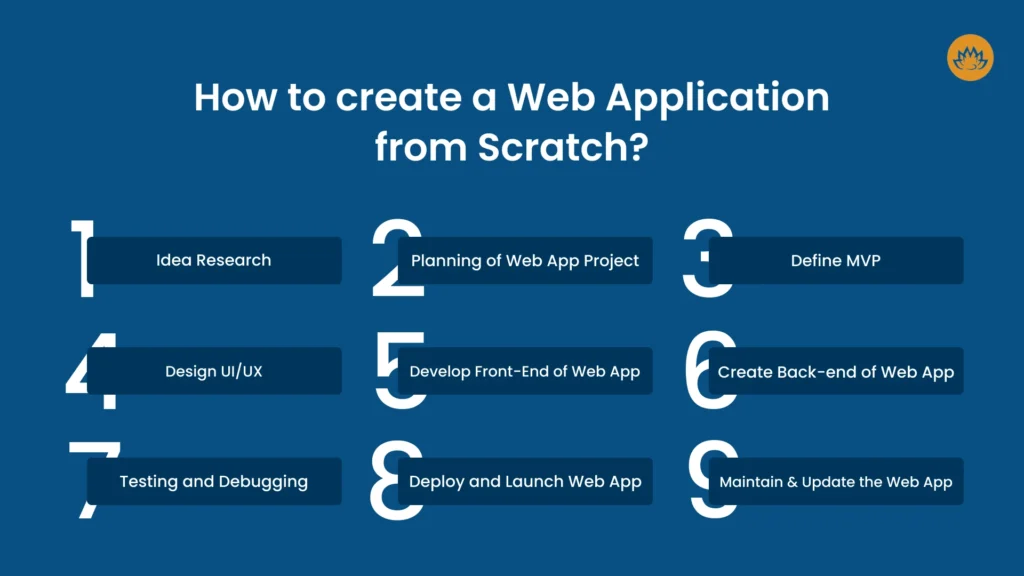
Step 1: Plan Your App Before You Code
The biggest mistake beginners make is jumping straight into code without a plan. Before writing a single line, answer these questions:
- What problem does your app solve? Keep it simple. A to-do list, a note-taking app, or a budget tracker is a perfect first project.
- Who is the user? Think about what the user needs to do and what experience they should have.
- What features are essential? List the core features — don’t try to build everything at once. Start with the minimum that makes the app useful.
Sketch out your pages and user flow on paper or using a free tool like Figma or Excalidraw. This saves hours of confusion later.
Step 2: Choose Your Tech Stack
A “tech stack” is the combination of technologies you’ll use to build your app. For a beginner, keep it simple. Here’s a great starter stack:
Frontend (what users see):
- HTML — Structure of your pages
- CSS — Styling and layout
- JavaScript — Interactivity and logic
Backend (server-side logic):
- Node.js with Express — Lightweight and beginner-friendly
- Or Python with Flask/Django — Great if you already know Python
Database (storing data):
- MongoDB — Flexible, document-based (great with Node.js)
- PostgreSQL or MySQL — Relational databases, great for structured data
A popular beginner-friendly combination is the MERN stack — MongoDB, Express, React, and Node.js. But if React feels too advanced right now, start with plain HTML, CSS, and JavaScript on the frontend.
Step 3: Set Up Your Development Environment
Before coding, set up your tools:
- Code Editor — Download Visual Studio Code (VS Code). It’s free, lightweight, and has excellent extensions for web development.
- Node.js — Install it from nodejs.org. This also gives you access to npm (Node Package Manager) for installing libraries.
- Git — Install Git for version control. This lets you track changes and back up your code.
- Browser DevTools — Chrome or Firefox DevTools are built-in and essential for debugging.
Once everything is installed, create a project folder, open it in VS Code, and you’re ready to start building.
Step 4: Build the Frontend
Start with the user interface — what your app looks like and how it feels to use.
HTML gives your app structure. Create your main pages — a home page, a login page, a dashboard — using semantic HTML elements like <header>, <main>, <section>, and <form>.
CSS makes it look good. Use Flexbox and Grid for layouts. If you want to move faster, use a CSS framework like Tailwind CSS or Bootstrap to style things quickly without writing all the CSS from scratch.
JavaScript makes it interactive. Use JavaScript to handle button clicks, form submissions, show/hide elements, and fetch data from your backend using the Fetch API or Axios.
Keep your frontend clean and focused. Get the basic layout and core interaction working before moving on.
Step 5: Build the Backend
The backend is the engine of your app. It handles business logic, talks to the database, and sends data to the frontend.
If you’re using Node.js with Express, here’s the basic flow:
- Initialize your project with
npm init - Install Express:
npm install express - Create a server file (
server.js) and define your routes - Connect to your database using a library like Mongoose (for MongoDB) or Sequelize (for SQL databases)
Your backend will expose API endpoints — URLs that your frontend can call to get or send data. For example:
GET /api/tasks— Returns all tasksPOST /api/tasks— Creates a new taskDELETE /api/tasks/:id— Deletes a specific task
This pattern is called a REST API and is the standard way web apps communicate between frontend and backend.
Step 6: Connect to a Database
Most web apps need to store data — user accounts, posts, settings, and more. Choose a database and connect it to your backend.
For beginners, MongoDB Atlas is highly recommended. It’s a cloud-based database that’s free to start, easy to set up, and pairs perfectly with Node.js.
Steps to get started:
- Create a free account at mongodb.com
- Create a cluster and get your connection string
- Use Mongoose in your Node.js app to define data models and connect to the database
With your database connected, your app can now save and retrieve real data — this is where things start feeling truly powerful.
Step 7: Add User Authentication
Almost every real app needs users to sign up and log in. Authentication might sound complex, but there are tools that make it manageable.
The most common approach is JWT (JSON Web Tokens):
- User logs in with email and password
- Backend verifies credentials and sends back a token
- Frontend stores the token and sends it with every future request
- Backend verifies the token to confirm the user’s identity
For a faster and more secure setup, consider using Firebase Authentication or Auth0 — both handle the heavy lifting for you and are free to get started.
Step 8: Test Your App Thoroughly
Before you share your app with anyone, test it carefully.
- Try every feature as a real user would — sign up, log in, create data, edit it, delete it.
- Test what happens when things go wrong — wrong passwords, empty fields, slow internet.
- Use Postman to test your API endpoints directly and verify they return the correct data.
- Open your browser’s DevTools console and fix any JavaScript errors.
Good testing now saves you from embarrassing bugs later.
Step 9: Deploy Your App
Deploying means making your app available on the internet for everyone to access. Here are the best free options for beginners:
Frontend Deployment:
- Vercel — Perfect for static sites and React apps. Deploy with one click.
- Netlify — Similarly easy, great for frontend projects.
Backend Deployment:
- Render — Free tier available, easy Node.js and Python deployment.
- Railway — Simple and beginner-friendly for backend apps.
Database:
- MongoDB Atlas — Free cloud database, works seamlessly with your deployed backend.
Connect your GitHub repository to your chosen platform, configure your environment variables, and deploy. Within minutes, your app will have a live URL you can share with anyone.
Step 10: Keep Improving
Your first version doesn’t have to be perfect — it just has to work. Once it’s live, start gathering feedback and keep building. Add new features, fix bugs, improve the design, and optimize performance.
Every great app started as a rough first version. The important thing is that you built something real and shipped it.
Tips for Success as a Beginner
- Start smaller than you think you need to. Scope creep is the #1 reason beginners never finish their projects.
- Google and Stack Overflow are your best friends. Every developer searches for answers — that’s completely normal.
- Use version control from day one. Commit your code to GitHub regularly so you never lose your progress.
- Don’t wait until it’s perfect. Launch early, improve often.
- Build something you actually care about. Passion keeps you going when things get tough.
Final Thoughts
Building your first web app from scratch is challenging, but it’s one of the most rewarding things you can do as a developer. You’ll learn more from building one real project than from completing dozens of tutorials.
Follow the steps, be patient with yourself, and embrace the learning process. Every bug you fix and every feature you ship makes you a better developer. Start today — your first web app is closer than you think.